Visual Test Shell – Sending Packets Manually
After configuring the Devices (and Objects), Ports, and Names in the Visual Test Shell (VTS) the next step is to begin sending packets. Packets can be sent in two ways:
- Manually creating and sending the packets
- By using a script.
This article will focus on manually sending packets.
In this article you will find instructions on how to create and send a Who-Is message. Please note that there are many other messages that can be created and sent and that some experimentation is necessary to fully understand how to create these messages.
Who-is
The following instructions are for creating and sending a Who-Is message.
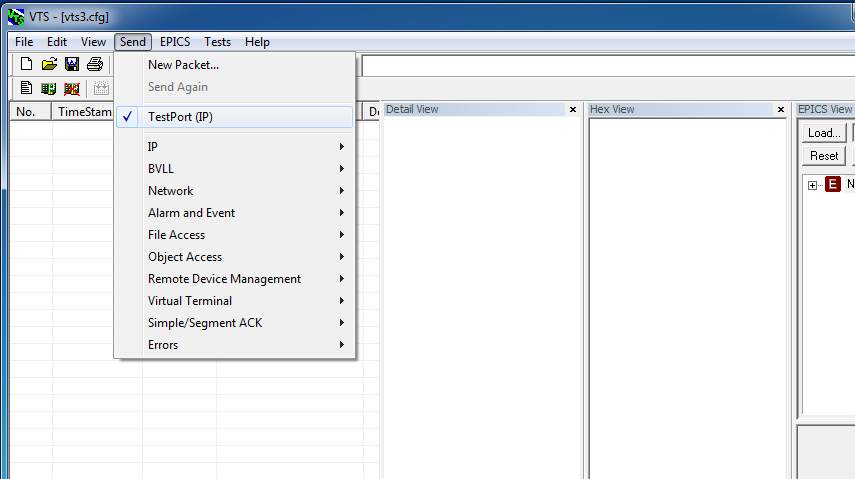
- Click on the “Send” menu. (See Figure 1: Send Menu)
- New Packet – Opens the send packet dialogue
- TestPort(IP) – This is where any ports that you configured will be. Select one to begin sending packets from that port.
- IP, BVLL, Network – The rest of the items in the menu are submenus that contain specific message types. For example in the “Object Access” submenu you will find the Read Property option. Click on one of these options to begin creating a packet of that type.
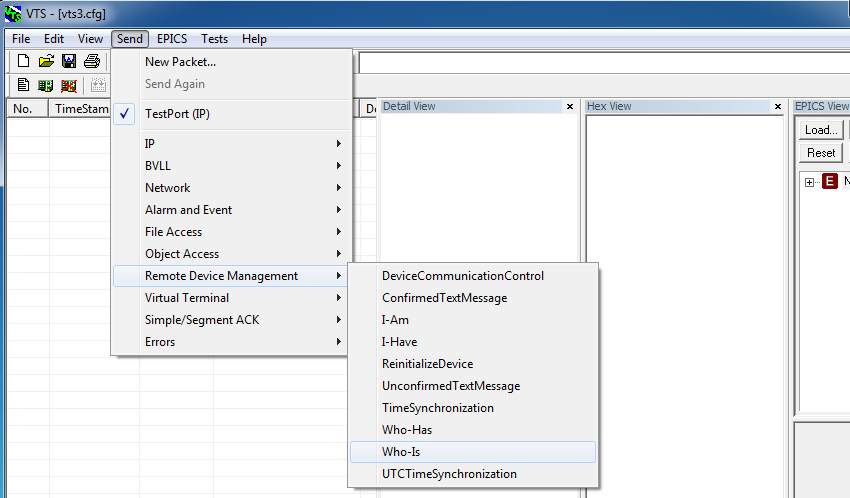
- Move the mouse over the “Remote Device Management” submenu and Click on the “Who-Is” message. (See Figure 2: Send Packet – Who-Is
- View the Send Packet dialogue. Note: the dialogue will contain different options depending on what was selected from the “Send” menu. (See Figure 3: Send Packet Dialogue – Who-Is). Configure the Who-Is fields contained in the Who-Is tab
- Tabs-The tabs at the top of the window contain the configurable fields to create the packet. The tabs will change depending on what packet is being created. In this case, for creating the Who-Is message, the IP (IP options), BVLCI (Broadcast options), NPCI (NPDU options) , and Who-Is (Who-Is options) tabs will be displayed.
- TestPort Drop Down Menu –The drop down menu on the upper right contains all the Ports that have been configured. Use this menu to quickly select a Port.
- File Browser – The file browser on the right side of the window contains the different message types. Browse through them and double click on the message you want to send to begin configuring it.
- Hex Stream – The hex stream at the bottom left of the window contains the bytes that will be sent. These will change as you change the fields in each of the tabs.
- Buttons – The buttons on the bottom right allow you to send the pack and/or to close the window.
- Click through the other tabs and fill in the information required there.
- When you are satisfied with the packet you created, you can View the byte stream that will be sent, then Click the “Send” or “Send and Close” to send the packet. If you do not want to send the packet, simply Click the “Close” button. (See Figure 4: Byte Stream and Buttons)
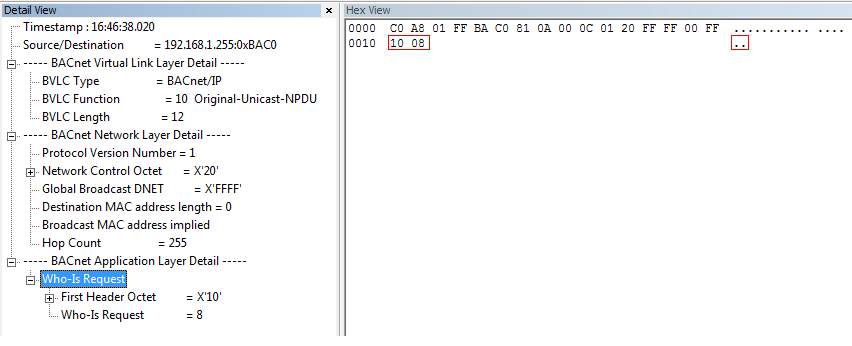
- You can see the packet information in detail in the “Detail View” or the “Hex View” frames. Note: You can click on various sections in the Detail View which will highlight the actual bytes in the Hex View. (See Figure 5: Detail View and Hex View )

- Here is a brief description of the menu options:


The following is a brief description of the dialogue window:


Once the packet has been sent, you can keep track of the packets sent in the main view. There is another way to send packets, and that involves using scripts. The next article will discuss what elements are in a VTS script and how they are used to send packets