Visual Test Shell: Configuring Names
After configuring the Devices and Ports, the next step is to configure the Names. In the Visual Test Shell (VTS) a name is a shortcut for an address. They are used not only in the source and destination address areas of ports, but also in the SNET and DNET portion of the BACnet network layer.
Note: A Name specifies the physical (MAC) address AND the local Port for a BACnet destination. AS such, make sure to set up a Port for the device (see the Visual Test Shell – Configuring Ports article) BEFORE setting up a Name.
Note: VTS will create an entry for itself named TD ( or Test Device). Remember, however, that you MUST create an entry for the device being tested, and it must be named IUT, which stands for Implementation Under Test.
Follow these steps and descriptions to configure a Name.
1) Click on the "Edit" menu and Select the "Names…" option (see Figure 1: Configuring Names )
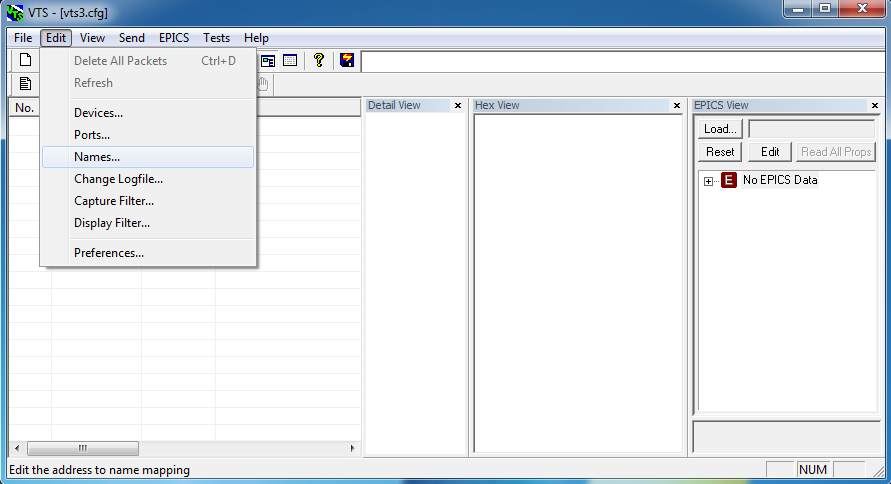
Figure 1:
Configuring Names
2) In the Names dialogue, Click the "New" Button to begin configuring a new Name (see Figure 2: Configure Names Dialogue )
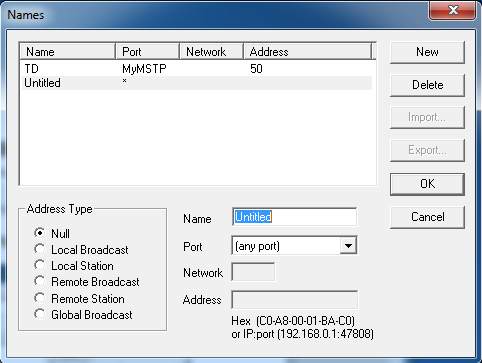
Figure 2: Configure Names Dialogue
3)Fill in the fields and options. The following is a brief description of the various options for configuring a Name.
Address Type
- Null – No type chosen. Use this when you aren't sure what Address Type is appropriate and want to fill it in later.
- Local Broadcast – Packets are sent to all devices on the local network.
- Local Station – Sends packets to any specific device on the local network.
- Remote Broadcast – Packets are sent to all devices on the specified network.
- Remote Station – Sends packets to any specific device the specified network, usually a network other than the TD's local network.
- Global Broadcast – Packets are sent to all devices on all reachable networks.
Name – Give the entry a name
Note: IUT has a special meaning in VTS because scripts will automatically SEND and EXPECT messages from whatever address is associated with the IUT name, as long as an explicit destination is not specified in the script.
- Port – Choose one of the configured Ports. If no Ports have been configured, the only option will be "any port".
- Network – If you selected Remote Broadcast or Station as the Address Type, then enter in the specific network in this field.
- Address – If you selected Remote Station as the Address Type, then enter in the remote device's address in this field.
4) Once all the fields have been filled, Click the "Okay" button to finalize the Name configuration. You can create and configure more Names byClicking the "New" button, or delete unneeded Names by Clicking the "Delete" button.
Configuring names is the last part of the configuring the VTS. Once the configuration is complete, the next step is to test the configuration. The easiest way to test your configuration is to send packets. The next article will describe how to send packets manually.