FieldServer Toolbox for Diagnostics and Debugging
 Download the FieldServer Toolbox: You
can download the FieldServer Toolbox Manual HERE!
Download the FieldServer Toolbox: You
can download the FieldServer Toolbox Manual HERE!
OVERVIEW
The Fieldserver Toolbox is a windows application that is used to discover, monitor and configure the protocol gateways that Chipkin sells. Once discovered the user may use the toolbox to connect directly to the gateway. Once connected the following operations are possible:
- Check the status and diagnostics of a FieldServer including such information as network settings, connection info, node discovery & information, map descriptors, and error messages.
- Monitor a working FieldServer's internal data and parameters.
- Change or update a FieldServer's internal data and parameters.
- Upload and download files FieldServer.
- Delete files on a FieldServer.
- Change the FieldServer's IP Address
- Set Admin and User Passwords for security
- Restart a FieldServer.
The FS-GUI is shipped with every ProtoAir, QuickServer, FS-B35XX Series and SlotServer FieldServer Gateway.
PC Requirements
Hardware:
- A Computer with web browser that connects over Ethernet on port 80.
Software:
The Utilities run under the following web browsers:
- Chrome 19.0 and higher
- Firefox 13.0 and higher
- Opera 11.0 and higher
- Internet Explorer 81 and higher
- Safari 4.1 and higher
NOTE - Computer and network firewalls must be opened for Port 80 to allow FS-GUI to function.
Utility – FieldServer Toolbox
- The FieldServer Toolbox is used in FieldServers discovery on the network. The Toolbox can be found on the flash drive shipped with the FieldServer, or it can be downloaded HERE!
- After downloading, it will be available as an icon on the desktop.
- The Toolbox will only find FieldServers existing on the same subnet as the computer.
- The FS-GUI PC and the FieldServer have to be set up with an IP Address on the same subnet.
CONNECTING TO A FIELDSERVER
Power Up the Device
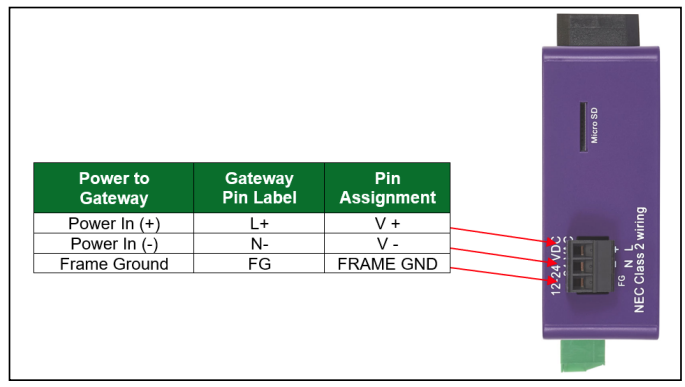
Apply power to the device. Ensure that the power supply used complies with the specifications provided in. Ensure that the cable is grounded using the "Frame GND" terminal. The FieldServer is factory set for 9-30VDC or 12-24VAC..
Connect the PC to the FieldServer Over the Ethernet Port
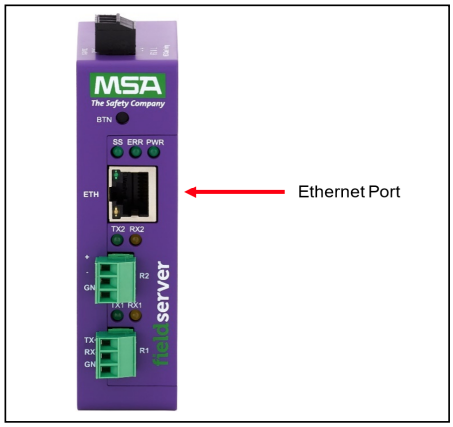
- Connect an Ethernet cable between the PC and FieldServer or connect the FieldServer and the PC to the Hub/switch using a straight CAT5 cable.
- The Default IP Address of the FieldServer is 192.168.2.101, Subnet Mask is 255.255.255.0. If the PC and the FieldServer are on different IP Networks, assign a Static IP Address to the PC on the 192.168.2.101 network.
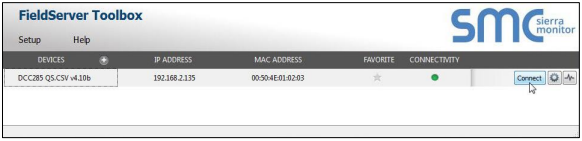
Connecting to the FieldServer: Using the FieldServer Toolbox to Launch FS-GUI
- Install the FS Toolbox application from the USB drive or download it HERE!
- Use the FS Toolbox to find the FieldServer, and launch the FS-GUI.
NOTE: If the connect button is greyed out, the FieldServer's IP Address must be set to be on the same network as the PC.
Connecting FieldServer to the SMC Cloud - The FieldPoP button (see Figure 3) allows users to connect to the SMC Cloud, Sierra Monitor's device cloud solution for IIoT. The SMC Cloud creates a secure remote connection to field devices through a FieldServer and its local applications for configuration, management, maintenance. For more information about the SMC Cloud, refer to the SMC Cloud Start-up Guide.
Using the Web Browser to Launch FS-GUI - If the IP Address is known, it can be typed directly into the web browser, and the FS-GUI will launch.
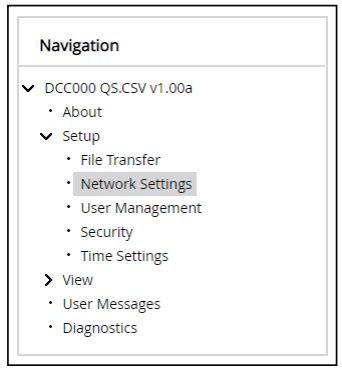
THE NAVIGATION TREE
- Root - The root of the navigation tree allows the user to check the status of the FieldServer gateway, including the configuration code, version, memory, gateway type and more. Under "Settings" the user has access to important network information. The name of the root is specified in the FieldServer Configuration file under the Title Keyword and is therefore completely user definable.
- About - Allows the user to check current firmware of the FieldServer gateway plus version identification of the interface and skin, plus contact information. Skin is either the default FieldServer template or it can be a specific template specified by the owner.
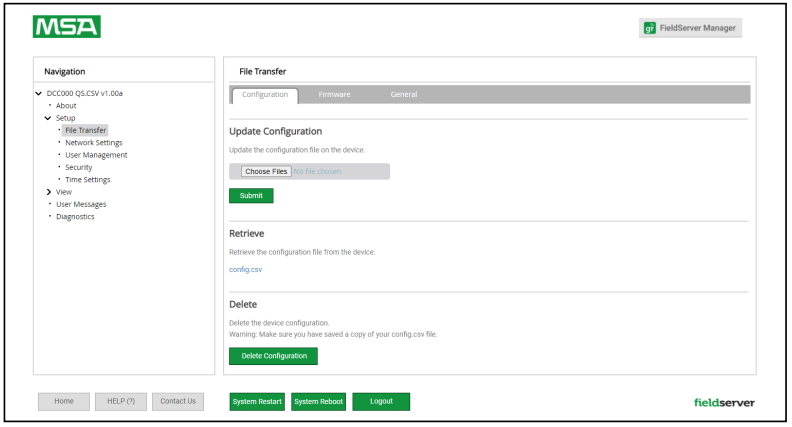
File Transfer
There are 3 types of files that can be uploaded or downloaded to the gateway, namely; Configuration Files, Firmware and miscellaneous (general) files.
Configuration Files
Configuration files have a .csv extension, and are used to configure the FieldServer gateway for its specific application. See the FieldServer Manual HERE!
- Update the configuration file: - To update the FieldServer's configuration file, click the browse button and select the configuration file (.csv). Click open, and submit. Wait until the message "Configuration update complete" appears, and click the System Restart button to activate the new configuration file.
- Download the Fieldserver configuration file: - For making changes to the configuration file – Retrieve the file, edit it, save the updated file and update the file (as described in the section above).
- Delete the configuration file: - To temporarily disable the FieldServer's protocol communications, the configuration can be deleted. The FieldServer needs to be restarted to activate the changes. This action cannot be undone - make sure to create a backup copy of the configuration file before taking this action.
Firmware Files
The FieldServer Firmware contains the application program commonly referred to as the DCC or the PCC. This program contains the protocol drivers applicable to the application and the FieldServer Operating System Kernel. A Firmware update is only required when updated files are received from FieldServer support. Firmware files have a .bin extension.
General (Other) Files
Other files that can be updated include the FS-GUI image, and other files described in driver manuals. The procedure for updating these is the same as for configuration files, but the update needs to be made in the "General" update section.
Network Settings
-
On the Network Settings Page, the Ethernet adaptor settings of the FieldServer gateway can be changed. The N1 and N2 (if supported) adaptor IP Address, Netmask, two Domain Name Servers and default Gateway can be changed by entering values in the applicable fields and clicking on the Update IP settings Button.
-
NOTE: The FieldServer gateway has to be restarted for any changed settings to take effect. Also note that enabling the DHCP client on any adaptor will cause the static IP Address settings to be overruled by a DHCP server on the network.
The FieldServer's built-in DHCP server can be enabled to establish easy connection for Support purposes. Set the laptop or computer to automatically obtain an IP Address to use this feature.
The FieldServer DHCP server periodically checks for other DHCP servers on the network and will disable itself should any other DHCP servers exist on the network. This method of operation is because the FieldServer DHCP server is strictly for support purposes and does not have all the features of a commercial DHCP server. Setting the default gateway IP Address to the network gateway ensures the FieldServer is reachable on the internet.
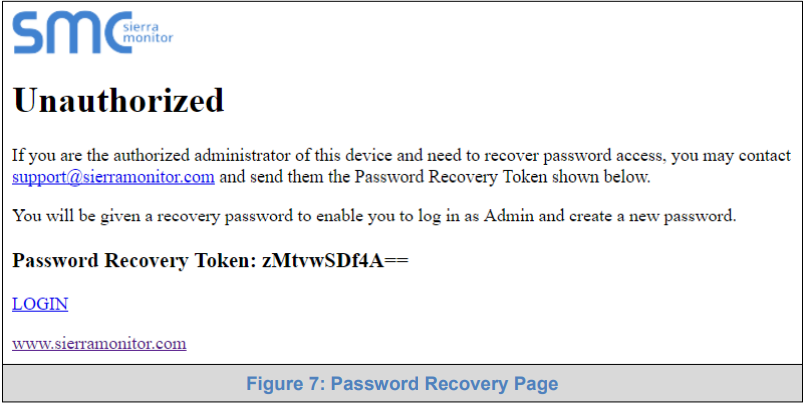
Passwords
The password can be found in the FieldServer. If the password has been lost, click cancel on the password authentication popup window, and e-mail the Password recovery token to [email protected] to receive a temporary password from the Sierra Monitor support team. Access to the FieldServer is now available to set a new password.
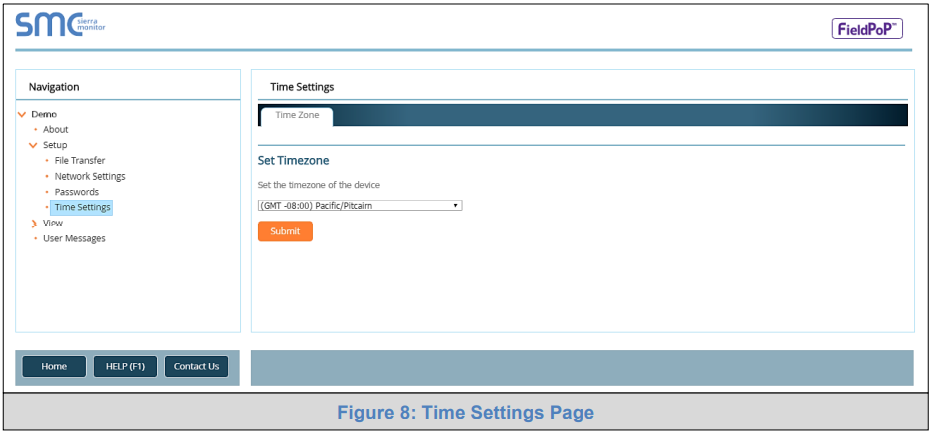
Setting Time Zone
The time zone of the FieldServer gateway should be set to generate accurate data.
- Navigate to the FS-GUI page using one of the following methods:
- From Web Configurator – click the "Diagnostics and Debugging" button on the bottom right corner of the page
NOTE: The FieldServer has to be restarted for any changed settings to take effect. Also note that enabling the DHCP client on any adaptor will cause the static IP Address settings to be overruled by a DHCP server on the network.
- If there is no "Diagnostics and Debugging" button in the bottom right corner of the page, check for a "Diagnostics" tab along the top of the page or a "Diagnostics" link next to the Sierra Monitor Copyright statement at the bottom center of the page.
- Click Setup on the navigation tree.
- Click "Time Settings".
- Select the appropriate time zone then click Submit.
View
- Connections - The Connections screen supplies information on communication between the FieldServer and remote devices.A number of aspect screens are available,including settings, info stats and error stats. The information on these screens cannot be changed, and is for viewing only.
- Data Arrays - The Data Arrays screens can be used to view the values in Data Arrays. The values can be changed by clicking on the "Enabled Grid"- button, and changing the value in the data array grid.
- Nodes - On the Nodes screens information about the remote devices on each connection can be viewed. A number of aspect screens are available, including settings,status, info stats and error stats. The information on these screens cannot be changed, and is for viewing only.
- Map Descriptors - On the Map Descriptors screens information on each individual Map Descriptor can be viewed. A number of aspect screens are available, including settings,status, info stats and error stats. The information on these screens cannot be changed, and is for viewing only.
- User Messages - The user message screens display FieldServer messages generated by drivers and the operating system. User messages on the "Error"- screen usually indicate some problem with the configuration or communication and should be attended to. User messages of an informational type will be displayed on the"Info"- screen, and no user action is usually required. Messages generated by protocol drivers will be displayed on the "Driver"- screen. These messages convey protocol specific information that can be useful for field integration purposes. Finally, the "Combined"- screen contains all messages chronologically from all the above message screens.
NOTE: If values are being written into the Array by a driver, then any modifications made by grid editing will be overridden.

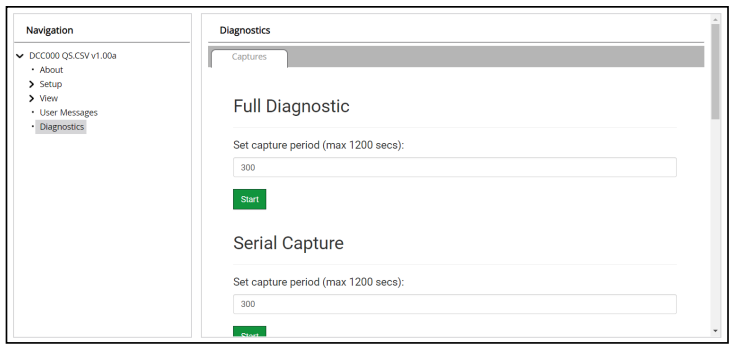
Diagnostics
Diagnostic Capture via FS-GUI is only available on FieldServers with a bios updated/released on November 2017 or later. Completing a Diagnostic Capture through the FieldServer allows network connections (such as Ethernet and Wi-Fi) to be captured. Once the Diagnostic Capture is complete, email it to technical support. The Diagnostic Capture will accelerate diagnosis of the problem.
- Open the FieldServer FS-GUI page.
- Click on Diagnostics in the Navigation panel.
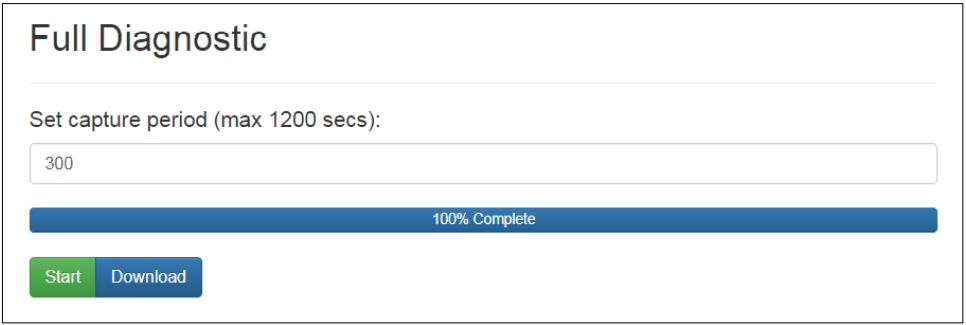
- Go to Full Diagnostic and select the capture period.
- Click the Start button under the Full Diagnostic heading to start the capture.
- When the capture period is finished, a Download button will appear next to the Start button
- Click Download for the capture to be downloaded to the local PC.
- Send the diagnostic zip file to technical support.
FieldServer Toolbox Display Issues
If the FieldServer Toolbox appears to be stretched out or not displaying correctly, see the image below for the correct display (normal window boarders have been removed). If the FieldServer Toolbox does not have a similar appearance there may be an issue with the DPI scaling.

To fix a DPI scaling problem try the following:
- Right click on the FieldServer Toolbox icon and then click on Properties.
- Click the Compatibility tab..
- Enable the "Override high DPI scaling" option.
- Change the drop down menu that appears to "System-Enhanced".
- Click OK to save the new settings.
FREE CAS BACNET EXPLORER WITH THE PURCHASE OF A BACNET GATEWAY!
Purchase a FieldServer or CAS Gateway from us that contains any BACnet protocol and we will help you test and document the BACnet interface by providing a free full license to the CAS BACnet Explorer and a hard copy of the BACnet booklet.
The USB key and booklet ships with the product.
Thanks for choosing Chipkin's protocol gateways, data clients, and integration services to meet your building and industrial automation requirements!
Chipkin™ is a building and industrial automation protocol expert. We develop, configure, install and support gateways (protocol converters), data loggers and remote monitor and controlling applications. Founded in October 2000, Chipkin provides expert solutions for converting BACnet®, Modbus®, and LonWorks®—to name just a few—and enabling interfaces for HVAC, fire, siren, intercom, lighting, transportation and fuel systems. The high-quality products we offer (including those from other vendors) interface with Simplex™, Notifier™, McQuay™, GE™ and many others—so you can rest assured that we will select the most appropriate solution for your application.
With Chipkin you are buying a solution. Our configuration expertise in this field combined with free BACnet and other tools ensure your success; and our customer support via phone, e-mail, and remote desktop tools means that we're there when you need us. Chipkin is a small responsive company, and we live or die by the quality of our service—and with offices in two-time zones—we can provide support when you need it. Give us a call now!
Did you know that we also carry Integration Solutions?
Chipkin has integration solutions for almost every situation. We specialize in network protocol communications and have over 20+ years of experience. Click for more information:
Customer Support
Chipkin is proud to provide support for the products we sell. For technical support, sales, and customer service, please contact us at 1 (866) 383-1657 or E-Mail.
Click here for Chipkin's simplified support page!
For more support service information, visit our Support Page!